The Patch Retention Pixel can be used to automatically load Patch products on a web page.
If you are having issues with the automated process for adding Pixel Patch Products to your Shopify Theme this article will walk you through how to manually add the Pixel script tag to your Shopify theme’s code.
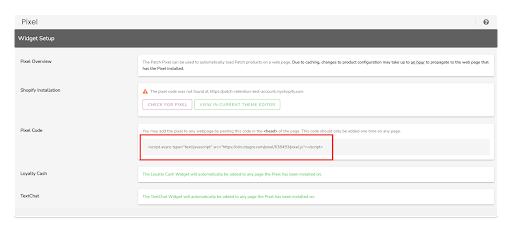
Note: Due to caching, changes to product configuration may take up to an hour to propagate to the web page that has the Pixel installed.
Step 1: Copy the script tag
While logged in to Patch Retention navigate to one of the following places to copy the script tag.
Note: All three places include the same script tag. This means that the script tag only needs to be added to your Shopify theme code once.
Pixel > Pixel Code
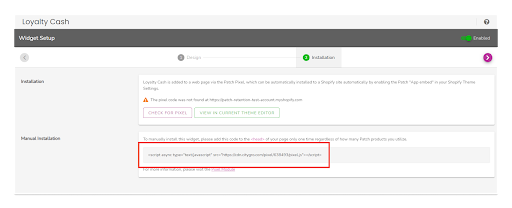
Loyalty Cash > Step 2 Installation > Manual Installation
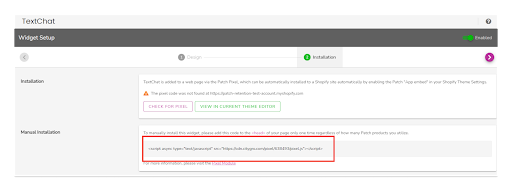
TextChat > Step 2 Installation > Manual Installation
Step 2: Click the‘ VIEW IN CURRENT THEME EDITOR’ button
From within any of the Patch Retention sections containing the script tag click the green view in the current theme editor button. This will open a new tab within your browser with a view of your Shopify Theme Editor.

Step 3: Navigate to the Shopify Theme’s Code Editor and click the theme.liquid file

Step 4: Find the closing </head> tag within the theme.liquid file
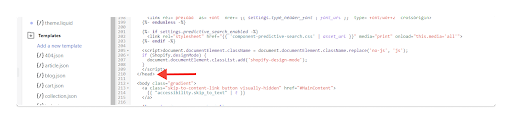
Step 5: Paste the Pixel script tag directly above the closing head tag

Step 6: Save your changes
Note: Due to caching, changes to product configuration may take up to an hour to propagate to the web page that has the Pixel installed.
How To Manually Delete the Script Tag to the Shopify Theme code:
Prior to uninstalling Patch Retention from your Shopify Store first follow steps 2-4. Then find the script tag that you previously added to your theme’s code and delete it. Be sure to save your updates.