Automate Your Patch Reports for Consistent Insights
This guide will walk you through the process of creating custom reports within Patch and setting up an automation to have these reports sent to you or your team via email on a regular schedule.
In this article:
- Step 1: Create a New Report
- Step 2: Specify Report Details
- Step 3: Download or Automate Your Report
- Step 4: Create an Automation for Scheduled Reports
- Step 5: Finalize and Enable Your Automation
- Monitoring Your Automation
Step 1: Create a New Report
- Initiate Report Creation: Click the (+) button in the lower right corner of the Reports module to start a new report.
- Name Your Report: Provide a descriptive name for your report and select ‘Filtered Event Log’ as the ‘Report Type’.
- Define Report Parameters: Choose the Date Range, Event Type(s), and Columns to Export. These parameters will determine the data included in your report.
Step 2: Specify Report Details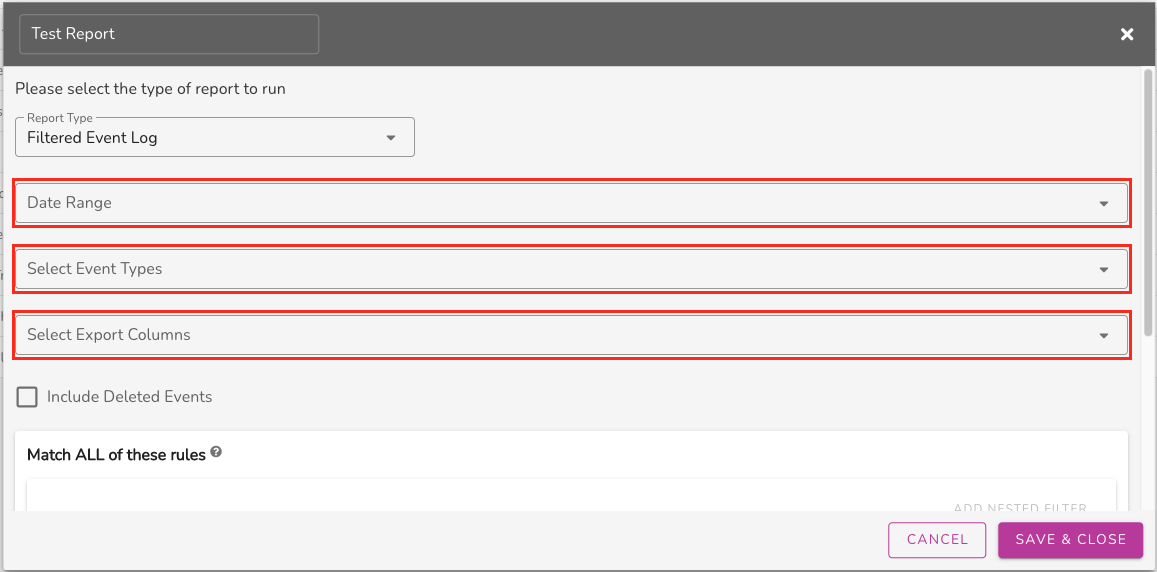
- Select a Date Range: Choose the appropriate timeframe for your report from the drop-down list.
- Pick Event Type(s): Choose from a list of events similar to those in the Activity Log. You can select multiple event types if needed.
- Configure Export Columns: Select the data columns you want to include in your report, similar to customizing views in the Contacts module. You can also apply a ‘Saved View’ for efficiency.
- Configure Filter Rules: Include rules to the report to more specifically filter the results.
Step 3: Download or Automate Your Report
- Download Your Report: Once your report is configured, download it immediately by selecting the ‘Download’ button.
- Set Up Report Automation: If you wish to receive this report regularly, proceed to set up an automation following the steps below.
Step 4: Create an Automation for Scheduled Reports
- Start a New Automation: In the Automations Module, click the (+) button and select ‘Start From Scratch’ to create a new automation.
- Name the Automation: Give your automation a clear name that reflects its purpose.
- Schedule the Report: Use the ‘At Time’ block to define when and how often the report should be sent. This block allows you to set a start date, end date, and frequency.
- Configure Report Generation: Add the ‘Create Report’ block and select the report you previously created.
- Select Recipient(s): Use the ‘Select Contacts’ block to specify who will receive the report. Ensure the recipient’s email address is already in the database.
- Compose Your Email: With the ‘Send Email’ block, draft your email, including the subject and sender details. Use the SmartText “” to include a clickable link to the report.
Step 5: Finalize and Enable Your Automation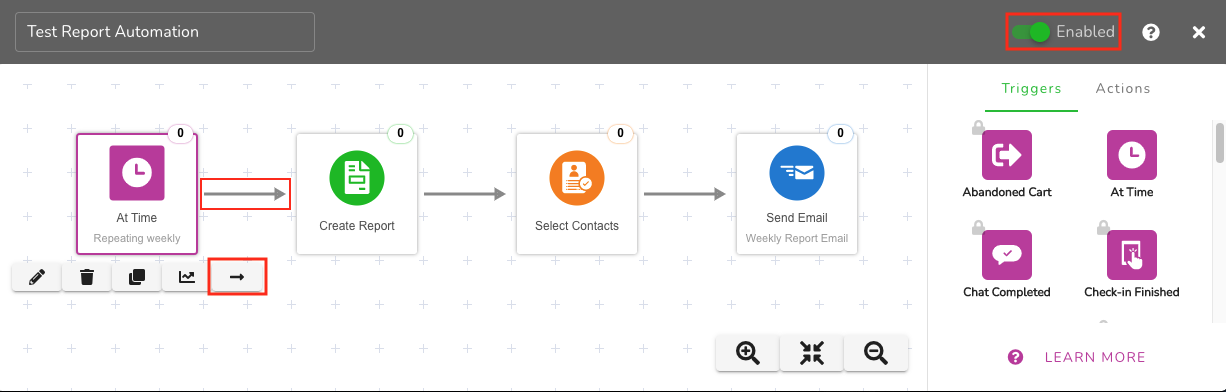
- Connect the Blocks: Link each block by dragging the arrow from one to the next, ensuring a logical flow.
- Activate the Automation: Turn on the automation using the toggle switch in the upper right corner.
Monitoring Your Automation
After the automation runs, the status will update to confirm its execution. You can monitor how many times the report has been generated and sent form the Automations list and the numbers on the blocks.
Once the report is created, you can download it by selecting the button!
Customer Support
If you need help or need assistance determining next steps, please contact our Customer Support team by phone 888.605.4429 or email success@patchretention.com.